TK-CANVAS-Teoría
Extraído de: https://www.tutorialspoint.com/ruby/ruby_tk_canvas.htm
Descripción
Traducción pendiente
Un recurso o artilugio o clase Canvas implementa la habilidad de manejar gráficos estructurados como línea, círculos, rectángulos, arcos, textos.
Syntaxis
Esta es esencialmente la sintaxis −
TkCanvas.new{
   .....Opciones standard....
   .....Opciones específicas (del widget) según la opción gráfica elegida....
}
Opciones Standard
- background
- borderwidth
- cursor
- highlightbackground
- highlightcolor
- highlightthickness
- relief
- selectbackground
- selectborderwidth
- selectforeground
- state
- takefocus
- tile
- xscrollcommand
- yscrollcommand
Opciones específicas del Widget
| 1 |
closeenough =>Integer
Especifica un valor de coma flotante que indica la proximidad del cursor del ratón a un elemento antes de que se considere que está dentro del elemento. El valor predeterminado es 1.0
|
| 2 |
confine =>Boolean
Especifica un valor booleano que indica si se debe permitir o no establecer la vista del widget fuera de la región definida por el argumento scrollregion. El valor predeterminado es true, lo que significa que la vista será restringida dentro de la región de desplazamiento.
|
| 3 |
height =>Integer
Especifica la altura de ventana deseada que el widget de Canvas debe solicitar al administrador de geometría.
|
| 4 |
scrollregion =>Coordinates
Especifica una lista con cuatro coordenadas que describen las coordenadas izquierda, superior, derecha e inferior de una región rectangular. Esta región se utiliza para fines de desplazamiento y se considera que es el límite de la información en el lienzo.
|
| 5 |
state =>String
Modifica el estado por defecto de Canvas que puede ser uno de estos: normal, disabled, or hidden. Individualmente cada objeto Canvas tiene sus propias opciones que predominan sobre el estado por defecto.
|
| 6 |
width =>Integer
Especifica la anchura de ventana deseada que el widget de Canvas debe solicitar al administrador de geometría.
|
| 7 |
xscrollincrement =>Integer
Especifica un incremento para desplazamiento horizontal, en cualquiera de las formas habituales permitidas para distancias de pantalla. Si el valor de esta opción es mayor que cero, la vista horizontal en la ventana será restringida de modo que la coordenada canvas x en el borde izquierdo de la ventana sea siempre un múltiplo par de xscrollincrement; además, las unidades para desplazamiento también serán xscrollincrement.
|
| 8 |
yscrollincrement =>Integer
Especifica un incremento para el desplazamiento vertical, en cualquiera de los formatos habituales permitidos para distancias de pantalla. Si el valor de esta opción es mayor que cero, la vista vertical en la ventana será restringida de manera que la coordenada y del lienzo en el borde superior de la ventana sea siempre un múltiplo par de yscrollincrement; además, las unidades para desplazamiento también serán yscrollincrement.
|
Indices
Los índices se utilizan para métodos tales como insertar texto, eliminar un rango de caracteres y establecer la posición del cursor de inserción. Un índice puede especificarse de varias formas, y diferentes tipos de elementos pueden soportar diferentes formularios para especificar índices.
los items de Texto soportan las siguientes maneras para un índice −
- number − Un número decimal que da la posición del carácter deseado dentro del elemento de texto. 0 hace referencia al primer carácter, 1 al siguiente carácter, y así sucesivamente.
- end − Refiere al carácter o coordenada justo después de la última en el elemento (igual que el número de caracteres o coordenadas en el elemento).
- insert − Se refiere al carácter justo antes de que el cursor de inserción se dibuja en este elemento. No válido para líneas y polígonos.
Creando Items
Cuando creas un nuevo widget con Canvas, éste puede ser esencialmente un rectángulo con nada dentro; verdaderamente es como un lienzo en blanco pero para hacer cualquier cosa que necesites con él necesitarás añadirle items.
Hay una extensa variedad de diferentes tipos de items que puedes añadir. los siguientes métodos puedes ser usados para crear diferentes items dentro de cada Canvas. −
Item Arc - ARCO -
Aparecerá arcos en el display. Un arco es una sección de un ovalo delimitado por dos ángulos. Los arcos son creados con la siguiente manera −
TkcArc.new(canvas, x1, y1, x2, y2, ?option, value, option, value, ...?)
Los argumentos x1, y1, x2, y y2 representan las coordenadas de dos esquinas opuestas por su diagonal correspondiente a una rectangular región que abarcaría al ovalo que define la arco. Esta es la descripción de otras opciones −
- extent => degrees − Especifica los grados abarcados por el arco. Si fuera mayor de 360 o menor de -360, entonces 360 es el módulo de media como extensión.
- fill => color − Rellena la región del arco con un color.
- outline => color − Especifica el color de la línea exterior del arco.
- start => degrees − Especifica el comienzo del rango angular ocupado por el arco.
- style => type − Especifica cómo se dibujará el arco. Si type es pieslice(por defecto es así) entonces la región del arco se define por una sección del perímetro del óvalo más dos segmentos de línea, uno entre el centro del óvalo y cada extremo de la sección del perímetro. Si type es chord entonces la región del arco se define por una sección del perímetro del óvalo más un solo segmento de línea que conecta los dos puntos finales de la sección perimetral. Si type es arc entonces la región del arco consiste en una sección del perímetro solo.
- tags => tagList − Especifies un conjunto de etiquetas (tags) para aplicar al item. TagList consiste en una lista de nombres de tag (etiquetas), lo cual reemplaza a cualquiera existente para ellos. TagList podría ser una lista vacía.
- width => outlineWidth − Especifica la anchura de la línea exterior del arco.
Bitmap Items
Items of type bitmap appear on the display as images with two colors, foreground and background. Bitmaps are created with methods of the following form −
The TkcBitmap.new(canvas, x, y, ?option, value, option, value, ...?)method will be used to create a bitmap.
The arguments x and y specify the coordinates of a point used to position the bitmap on the display. Here is the description of other options −
- anchor => anchorPos − AnchorPos tells how to position the bitmap relative to the positioning point for the item. For example, if anchorPos is center then the bitmap is centered on the point; if anchorPos is n then the bitmap will be drawn so that its top center point is at the positioning point. This option defaults to center.
- background => color − Specifies a color to use for each of the bitmap pixels whose value is 0.
- bitmap => bitmap − Specifies the bitmap to display in the item.
- foreground => color − Specifies a color to use for each of the bitmap pixels whose value is 1.
- tags => tagList − Specifies a set of tags to apply to the item. TagList consists of a list of tag names, which replace any existing tags for the item. TagList may be an empty list.
Image Items
Items of type image are used to display images on a canvas. Images are created with methods of the following form: :
The TkcImage.new(canvas,x, y, ?option, value, option, value, ...?)method will be used to create an image.
The arguments x and y specify the coordinates of a point used to position the image on the display. Here is the description of other options −
- anchor => anchorPos − AnchorPos tells how to position the bitmap relative to the positioning point for the item. For example, if anchorPos is center then the bitmap is centered on the point; if anchorPos is n then the bitmap will be drawn so that its top center point is at the positioning point. This option defaults to center.
- image => name − Specifies the name of the image to display in the item. This image must have been created previously with the image create command.
- tags => tagList − Specifies a set of tags to apply to the item. TagList consists of a list of tag names, which replace any existing tags for the item. TagList may be an empty list.
Line Items
Items of type line appear on the display as one or more connected line segments or curves. Lines are created with methods of the following form −
The TkcLine.new(canvas, x1, y1..., xn, yn, ?option, value, ...?) method will be used to create a line.
The arguments x1 through yn give the coordinates for a series of two or more points that describe a series of connected line segments. Here is the description of other options −
- arrow => where − Indicates whether or not arrowheads are to be drawn at one or both ends of the line. Where must have one of the values none (for no arrowheads), first (for an arrowhead at the first point of the line), last (for an arrowhead at the last point of the line), or both (for arrowheads at both ends). This option defaults to none.
- arrowshape => shape − This option indicates how to draw arrowheads. If this option isn't specified then Tk picks a reasonable shape.
- dash => pattern − Specifies a pattern to draw the line.
- capstyle => style − Specifies the ways in which caps are to be drawn at the endpoints of the line. Possible values are butt, projecting, or round.
- fill => color − Color specifies a color to use for drawing the line.
- joinstyle => style − Specifies the ways in which joints are to be drawn at the vertices of the line. Possible values are bevel, miter, or round.
- smooth => boolean − It indicates whether or not the line should be drawn as a curve.
- splinesteps => number − Specifies the degree of smoothness desired for curves: each spline will be approximated with number line segments. This option is ignored unless the smooth option is true.
- stipple => bitmap − Indicates that the line should be filled in a stipple pattern; bitmap specifies the stipple pattern to use.
- tags => tagList − Specifies a set of tags to apply to the item. TagList consists of a list of tag names, which replace any existing tags for the item. TagList may be an empty list.
- width => lineWidth − Specifies the width of the line.
Rectangle Items
Items of type rectangle appear as rectangular regions on the display. Each rectangle may have an outline, a fill, or both. Rectangles are created with methods of the following form −
The TkcRectangle.new(canvas, x1, y1, x2, y2, ?option, value,...?)method will be used to create a Rectangle.
The arguments x1, y1, x2, and y2 give the coordinates of two diagonally opposite corners of the rectangle. Here is the description of other options −
- fill => color − Fills the area of the rectangle with color.
- outline => color − Draws an outline around the edge of the rectangle in color.
- stipple => bitmap − Indicates that the rectangle should be filled in a stipple pattern; bitmap specifies the stipple pattern to use.
- tags => tagList − Specifies a set of tags to apply to the item. TagList consists of a list of tag names, which replace any existing tags for the item. TagList may be an empty list.
- width => outlineWidth − Specifies the width of the outline to be drawn around the rectangle.
Event Bindings
Canvas has the default bindings to allow scrolling if necessary: <Up>, <Down>, <Left> and <Right> (and their <Control-*> counter parts). Further <Prior>, <Next>, <Home> and <End>. These bindings allow you to navigate the same way as in other widgets that can scroll.
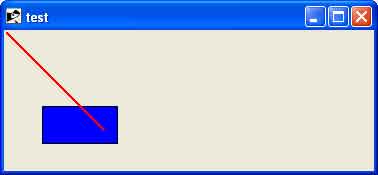
Example 1
require "tk"

canvas = TkCanvas.new

TkcRectangle.new(canvas, '1c', '2c', '3c', '3c', 'outline' => 'black', 'fill' => 'blue')

TkcLine.new(canvas, 0, 0, 100, 100, 'width' => '2', 'fill' => 'red')
canvas.pack

Tk.mainloop
This will produce the following result −

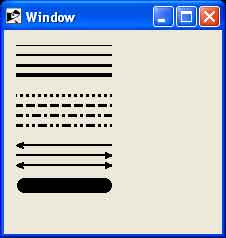
Example 2
require 'tk'

root = TkRoot.new
root.title = "Window"

canvas = TkCanvas.new(root) do
   place('height' => 170, 'width' => 100, 'x' => 10, 'y' => 10)
end

TkcLine.new(canvas, 0, 5, 100, 5)
TkcLine.new(canvas, 0, 15, 100, 15, 'width' => 2)
TkcLine.new(canvas, 0, 25, 100, 25, 'width' => 3)
TkcLine.new(canvas, 0, 35, 100, 35, 'width' => 4)
TkcLine.new(canvas, 0, 55, 100, 55, 'width' => 3, 'dash' => ".")
TkcLine.new(canvas, 0, 65, 100, 65, 'width' => 3, 'dash' => "-")
TkcLine.new(canvas, 0, 75, 100, 75, 'width' => 3, 'dash' => "-.")
TkcLine.new(canvas, 0, 85, 100, 85, 'width' => 3, 'dash' => "-..")
TkcLine.new(canvas, 0, 105, 100, 105, 'width' => 2, 'arrow' => "first")
TkcLine.new(canvas, 0, 115, 100, 115, 'width' => 2, 'arrow' => "last")
TkcLine.new(canvas, 0, 125, 100, 125, 'width' => 2, 'arrow' => "both")
TkcLine.new(canvas, 10, 145, 90, 145, 'width' => 15, 'capstyle' => "round")
Tk.mainloop
This will produce the following result −

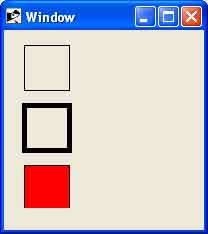
Example 3
require 'tk'

root = TkRoot.new
root.title = "Window"

canvas = TkCanvas.new(root) do
   place('height' => 170, 'width' => 100, 'x' => 10, 'y' => 10)
end

TkcRectangle.new(canvas, 10,  5,    55,  50, 'width' => 1)
TkcRectangle.new(canvas, 10,  65,  55, 110, 'width' => 5)
TkcRectangle.new(canvas, 10,  125, 55, 170, 'width' => 1, 'fill'  => "red")

Tk.mainloop
This will produce the following result −

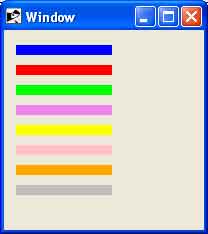
Example 4
require 'tk'

root = TkRoot.new
root.title = "Window"

canvas = TkCanvas.new(root) do
   place('height' => 170, 'width' => 100, 'x' => 10, 'y' => 10)
end

TkcLine.new(canvas, 0,  10, 100,  10, 'width' => 10, 'fill' => "blue")
TkcLine.new(canvas, 0,  30, 100,  30, 'width' => 10, 'fill' => "red")
TkcLine.new(canvas, 0,  50, 100,  50, 'width' => 10, 'fill' => "green")
TkcLine.new(canvas, 0,  70, 100,  70, 'width' => 10, 'fill' => "violet")
TkcLine.new(canvas, 0,  90, 100,  90, 'width' => 10, 'fill' => "yellow")
TkcLine.new(canvas, 0, 110, 100, 110, 'width' => 10, 'fill' => "pink")
TkcLine.new(canvas, 0, 130, 100, 130, 'width' => 10, 'fill' => "orange")
TkcLine.new(canvas, 0, 150, 100, 150, 'width' => 10, 'fill' => "grey")
Tk.mainloop
This will produce the following result −
